 No products in the cart.
T-SHIRT SIZE & PLACEMENT GUIDE SCREEN PRINTING
DTF Print Placement Guide
T-Shirt Size & Placement Guide
Use this professional t-shirt print placement guide to choose the correct print size for infant, toddler, youth and adult shirts. Perfect for DTF printing, screen printing, heat transfers, uniforms, event shirts and custom apparel.
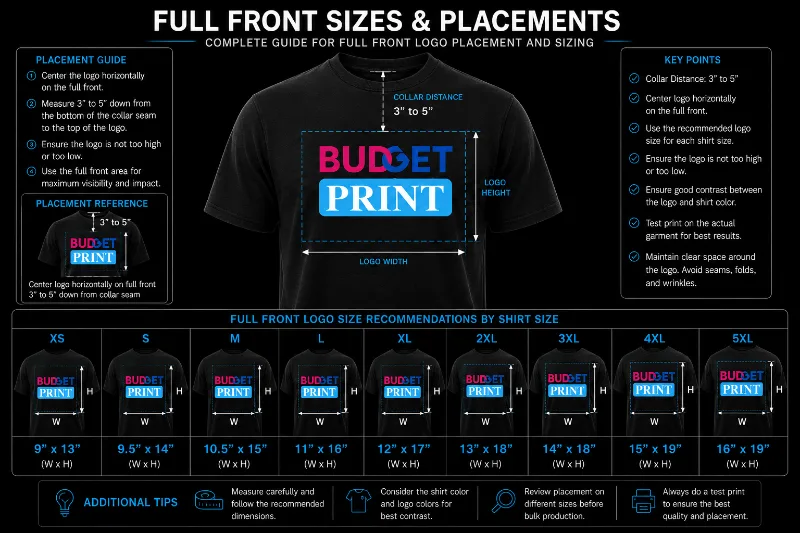
T-Shirt
Full Front
- 1. Bottom of Collar Distance
- 2. Max Width
- 3. Max Height
Use full front placement for large chest designs, business shirts, school apparel, event shirts, uniforms and promotional t-shirts. Measurements below show recommended maximum print size.
Full Front Sizes & Placements
Infant
Collar Distance: 1" to 1.5"
NB-3M: 4.5" x 4.5"
3M-6M: 5" x 5"
6M-12M: 5.5" x 5.5"
12M-18M: 6" x 6"
18M-24M: 6.5" x 6.5"
Toddler
Collar Distance: 1.5" to 2"
2T: 7" x 7"
3T: 7.5" x 8"
4T: 8.5" x 8.75"
5T: 8" x 8.5"
6T: 8.5" x 9"
Youth
Collar Distance: 2" to 3"
XS: 7.5" x 8"
S: 8" x 9"
M: 8.5" x 9.5"
L: 9" x 10"
XL: 9.5" x 11"
Adult
Collar Distance: 3" to 5"
XS: 9" x 13"
S: 9.5" x 14"
M: 10.5" x 15"
L: 11" x 16"
XL: 12" x 17"
2XL: 13" x 18"
3XL: 14" x 18"
4XL: 15" x 19"
5XL: 16" x 19"
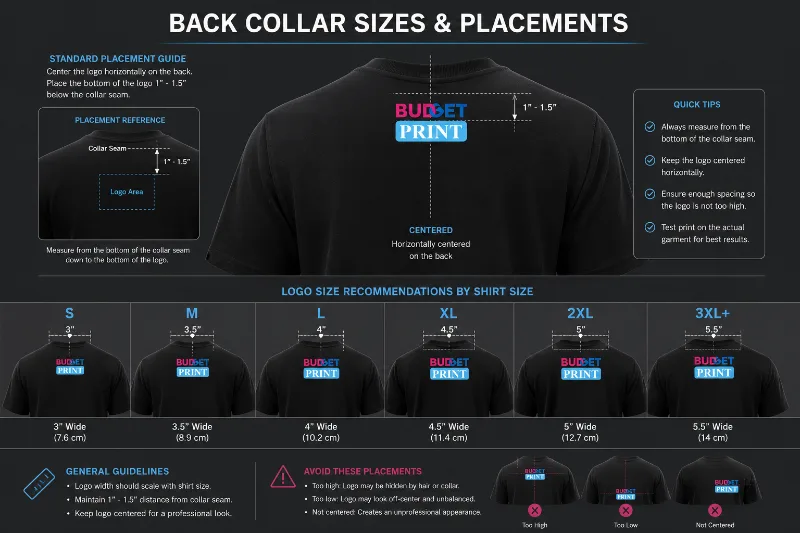
T-Shirt
Back Collar
- 1. Bottom of Collar Distance
- 2. Max Width
- 3. Max Height
Back collar placement is best for small brand logos, printed neck labels, boutique branding and small custom apparel details.
Back Collar Sizes & Placements
Infant
Collar Distance: 1"
NB-3M: 1" x 1"
3M-6M: 1" x 1"
6M-12M: 1" x 1"
12M-18M: 1" x 1"
18M-24M: 1.5" x 1.5"
Toddler
Collar Distance: 1"
2T: 1.5" x 1.5"
3T: 1.5" x 1.5"
4T: 1.5" x 1.5"
5T: 1.5" x 1.5"
6T: 1.75" x 1.75"
Youth
Collar Distance: 1" to 2"
XS: 1.5" x 1.5"
S: 1.5" x 1.5"
M: 1.75" x 1.75"
L: 1.75" x 1.75"
XL: 2" x 2"
Adult
Collar Distance: 1" to 2"
XS: 1.75" x 1.75"
S: 1.75" x 1.75"
M: 2" x 2"
L: 2.5" x 2.5"
XL: 2.5" x 2.5"
2XL: 2.5" x 2.5"
3XL: 3" x 3"
4XL: 3" x 3"
5XL: 3.5" x 3.5"
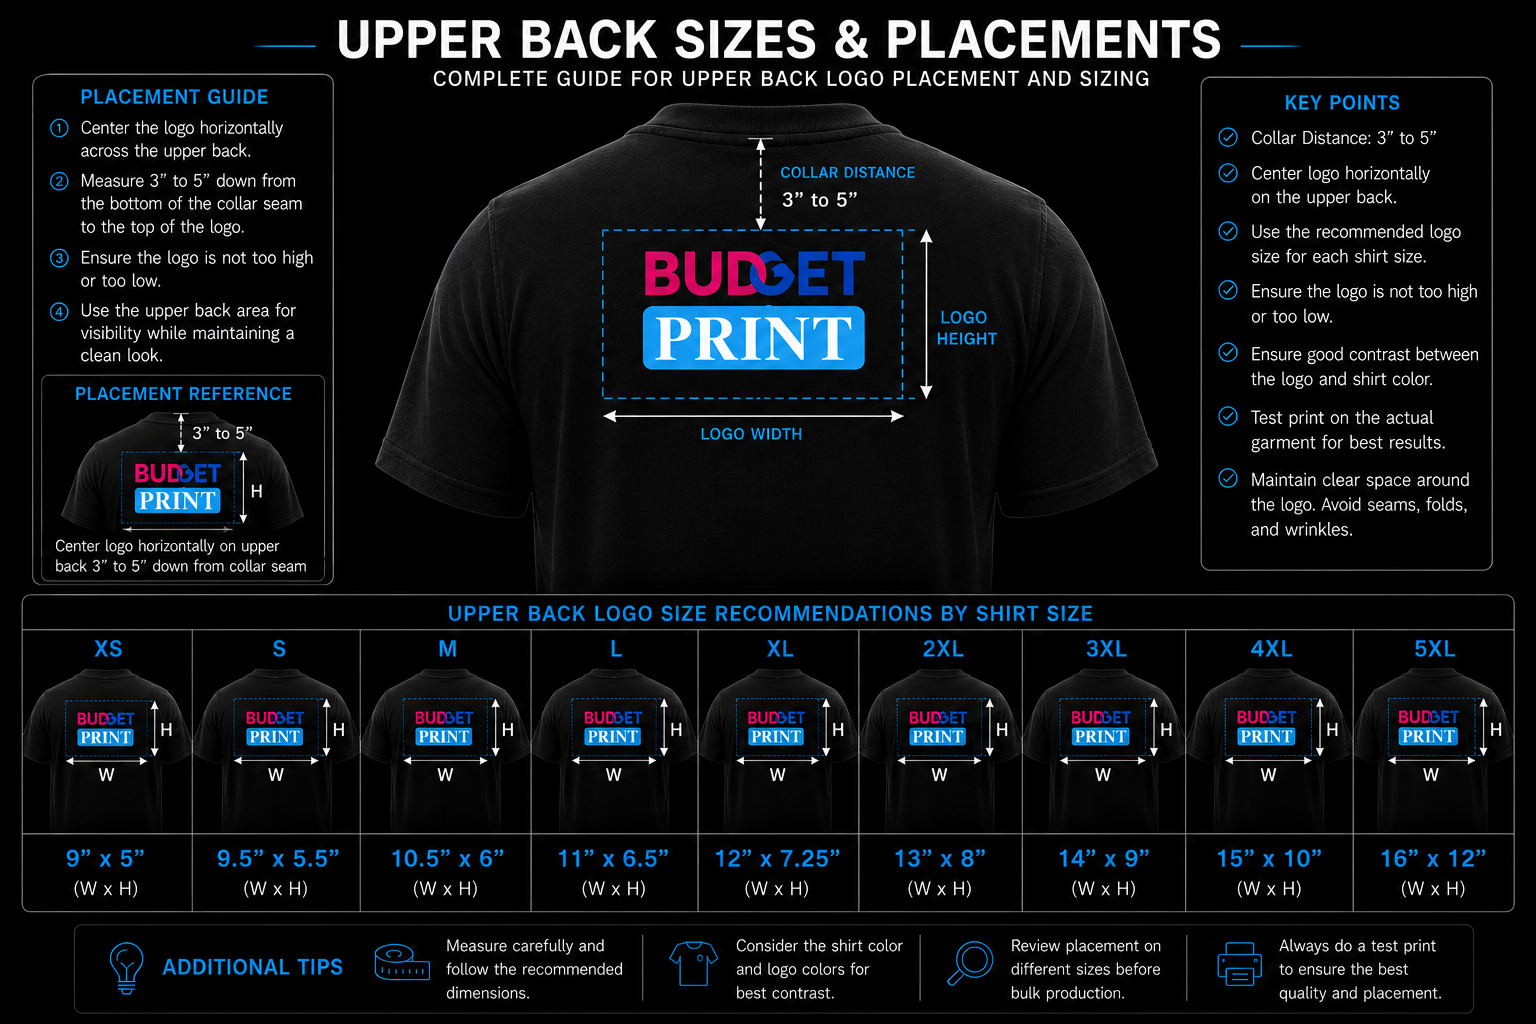
T-Shirt
Upper Back
- 1. Bottom of Collar Distance
- 2. Max Width
- 3. Max Height
Upper back placement works great for team names, staff shirts, sponsor logos, event shirts and back shoulder branding.
Upper Back Sizes & Placements
Infant
Collar Distance: 1" to 1.5"
NB-3M: 4.5" x 2.5"
3M-6M: 5" x 2.5"
6M-12M: 5.5" x 3"
12M-18M: 6" x 3.5"
18M-24M: 6.5" x 3.5"
Toddler
Collar Distance: 1.5" to 2.5"
2T: 7" x 3.5"
3T: 7.5" x 4"
4T: 8" x 4.25"
5T: 8.5" x 4.5"
6T: 9" x 4.75"
Youth
Collar Distance: 2.5" to 3"
XS: 7.5" x 4.25"
S: 8" x 4.75"
M: 8.5" x 5"
L: 9" x 5.5"
XL: 9.5" x 5.75"
Adult
Collar Distance: 3" to 5"
XS: 9" x 5"
S: 9.5" x 5.5"
M: 10.5" x 6"
L: 11" x 6.5"
XL: 12" x 7.25"
2XL: 13" x 8"
3XL: 14" x 9"
4XL: 15" x 10"
5XL: 16" x 12"
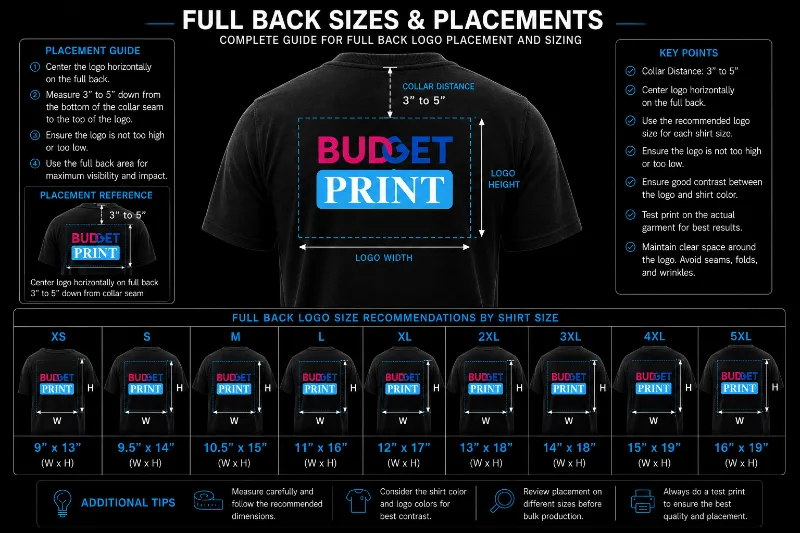
T-Shirt
Full Back
- 1. Bottom of Collar Distance
- 2. Max Width
- 3. Max Height
Full back placement is ideal for large back graphics, business uniforms, construction shirts, sports apparel and bold promotional designs.
Full Back Sizes & Placements
Infant
Collar Distance: 1" to 1.5"
NB-3M: 4.5" x 4.5"
3M-6M: 5" x 5"
6M-12M: 5.5" x 5.5"
12M-18M: 6" x 6"
18M-24M: 6.5" x 6.5"
Toddler
Collar Distance: 1.5" to 2.5"
2T: 7" x 7"
3T: 7.5" x 8"
4T: 8.5" x 8.75"
5T: 8" x 8.5"
6T: 8.5" x 9"
Youth
Collar Distance: 2.5" to 3"
XS: 7.5" x 8"
S: 8" x 9"
M: 8.5" x 9.5"
L: 9" x 10"
XL: 9.5" x 11"
Adult
Collar Distance: 3" to 5"
XS: 9" x 13"
S: 9.5" x 14"
M: 10.5" x 15"
L: 11" x 16"
XL: 12" x 17"
2XL: 13" x 18"
3XL: 14" x 18"
4XL: 15" x 19"
5XL: 16" x 19"
T-Shirt
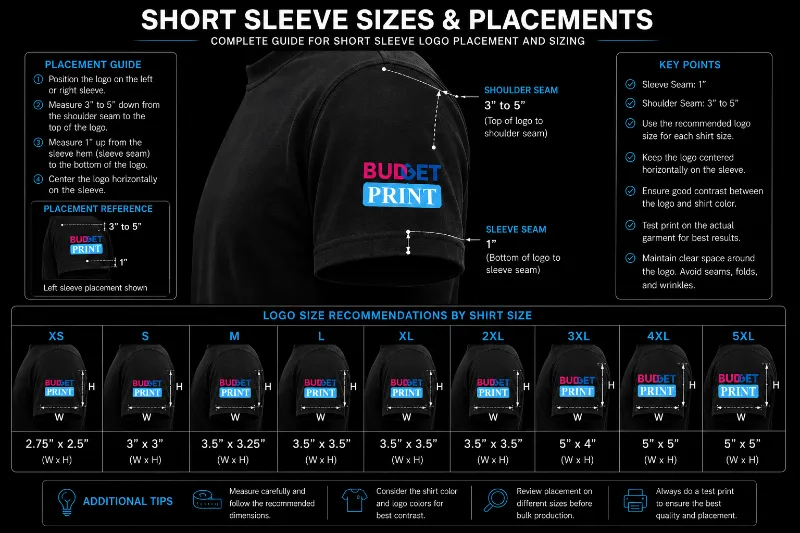
Short Sleeve
- 1. Sleeve Seam Distance
- 2. Max Width
- 3. Max Height
- 4. Shoulder Seam Distance
Short sleeve placement is best for small logos, flags, sponsor marks, badges and branded sleeve artwork.
Short Sleeve Sizes & Placements
Infant
Sleeve Seam: 0.75"
Shoulder Seam: 0.75"
NB-3M: 1.5" x 1.25"
3M-6M: 1.5" x 1.25"
6M-12M: 1.75" x 1.5"
12M-18M: 2" x 1.5"
18M-24M: 2" x 1.5"
Toddler
Sleeve Seam: 1"
Shoulder Seam: 2" to 3"
2T: 2" x 1.5"
3T: 2.25" x 1.5"
4T: 2.5" x 2"
5T: 2.5" x 2.25"
6T: 2.75" x 2.75"
Youth
Sleeve Seam: 1"
Shoulder Seam: 2" to 3"
XS: 2.5" x 2"
S: 2.75" x 2.5"
M: 3" x 2.5"
L: 3.25" x 2.75"
XL: 3.5" x 2.75"
Adult
Sleeve Seam: 1"
Shoulder Seam: 3" to 5"
XS: 2.75" x 2.5"
S: 3" x 3"
M: 3.5" x 3.25"
L: 3.5" x 3.5"
XL: 3.5" x 3.5"
2XL: 3.5" x 3.5"
3XL: 5" x 4"
4XL: 5" x 5"
5XL: 5" x 5"
T-Shirt
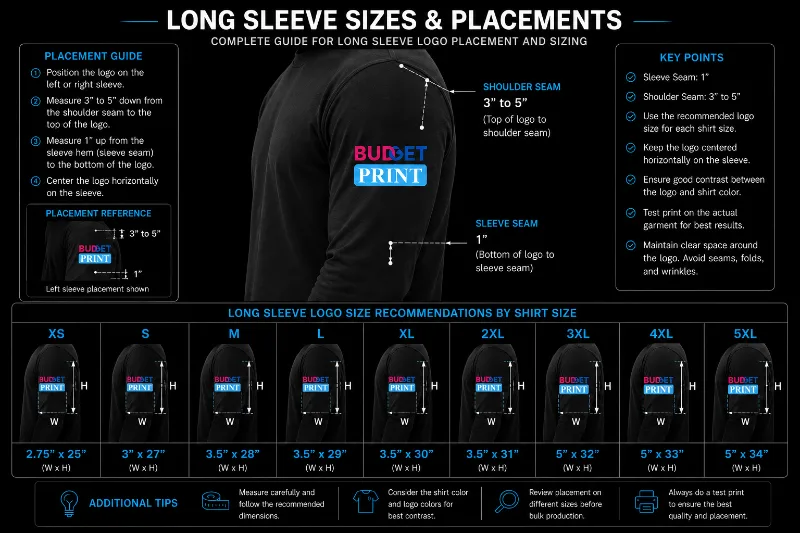
Long Sleeve
- 1. Sleeve Seam Distance
- 2. Max Width
- 3. Max Height
- 4. Shoulder Seam Distance
Long sleeve placement is great for vertical text, sleeve branding, team designs, full sleeve graphics and promotional apparel.
Long Sleeve Sizes & Placements
Infant
Sleeve Seam: 0.75"
Shoulder Seam: 0.75"
NB-3M: 1.5" x 6"
3M-6M: 1.5" x 8"
6M-12M: 1.75" x 9"
12M-18M: 2" x 10"
18M-24M: 2" x 12"
Toddler
Sleeve Seam: 1"
Shoulder Seam: 2" to 3"
2T: 2" x 12"
3T: 2.25" x 13"
4T: 2.5" x 14"
5T: 2.5" x 15"
6T: 2.75" x 16"
Youth
Sleeve Seam: 1"
Shoulder Seam: 2" to 3"
XS: 2.5" x 19"
S: 2.75" x 20"
M: 3" x 22"
L: 3.25" x 25"
XL: 3.5" x 27"
Adult
Sleeve Seam: 1"
Shoulder Seam: 3" to 5"
XS: 2.75" x 25"
S: 3" x 27"
M: 3.5" x 28"
L: 3.5" x 29"
XL: 3.5" x 30"
2XL: 3.5" x 31"
3XL: 5" x 32"
4XL: 5" x 33"
5XL: 5" x 34"
Note: These are recommended maximum print areas. Final placement may vary slightly depending on shirt brand, fabric, cut, size, and artwork shape.
Need Custom DTF Printed T-Shirts?
Budget Print creates professional custom shirts for businesses, schools, teams, events and brands.